Eureka 配置过程与理解
前言
起到微服务注册中心的作用,满足分布式系统中的 AP 原则,是弱一致性的。
Eureka 微服务架构
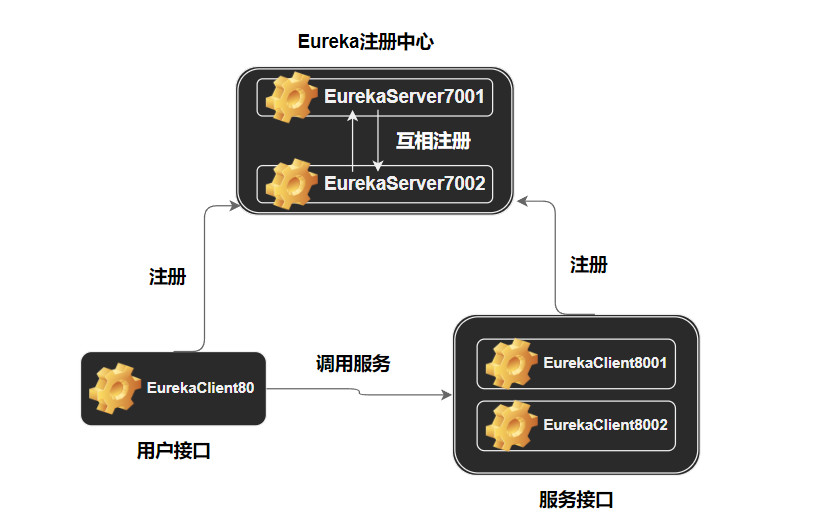
- 服务接口采用集群模式,8001 和 8002 端口都实现支付接口服务。
- 用户接口在运行在 80 端口,调用 8001 和 8002 的服务。
- 注册中心内部也采用集群模式,7001 和 7002 端口都实现注册服务。
Eureka 依赖
 1<!-- client端 -->
 2<dependency>
 3    <groupId>org.springframework.cloud</groupId>
 4    <artifactId>spring-cloud-starter-netflix-eureka-client</artifactId>
 5</dependency>
 6
 7<!-- server端 -->
 8<dependency>
 9    <groupId>org.springframework.cloud</groupId>
10    <artifactId>spring-cloud-starter-netflix-eureka-server</artifactId>
11</dependency>
7001 和 7002 端口关键配置内容
在启动类开启注解 @EnableEurekaServer:
1@SpringBootApplication
2@EnableEurekaServer
3public class EurekaMain7001 {
4    public static void main(String[] args) {
5        SpringApplication.run(EurekaMain7001.class, args);
6    }
7}
接着进行基础配置如下:
对于 7001 端口服务:(7002 端口类似)
 1eureka:
 2    instance:
 3    hostname: eureka7001.com
 4    client:
 5    # false 表示不向注册中心注册自己
 6    register-with-eureka: false
 7    # false 表示自己端就是注册中心,我的职责就是维护服务实例,并不需要去检索服务
 8    fetch-registry: false
 9    service-url:
10    # 设置与Eureka Server交互的地址查询服务和注册服务都需要依赖这个地址
11        defaultZone: http://eureka7002.com:7002/eureka/
注意 defaultZone 配置指向其他注册服务端口,需满足“相互注册”。
另外,eureka7001.com 和 eureka7002.com 其实配置指向 localhost,这里只是为了模拟多台机器。
8001 和 8002 端口关键配置内容
注:(2023-03-20 更新)
Eureka version 4.0.0 onwards, which is being used in Spring Cloud 2022.0.0, you do not need to explicitly register using the annotation @EnableEurekaClient It automatically gets registered as client if spring-cloud-starter-netflix-eureka-client is on the class path.
By having spring-cloud-starter-netflix-eureka-client on the classpath, your application automatically registers with the Eureka Server. Configuration is required to locate the Eureka server.
from stackoverflow
开启 @EnableEurekaClient 注解:
1@SpringBootApplication
2@EnableEurekaClient
3public class PaymentMain8001 {
4    public static void main(String[] args) {
5        SpringApplication.run(PaymentMain8001.class, args);
6    }
7}
@EnableEurekaClient 表明它是一个 Eureka 注册客户端。
接着进行基础配置如下:
 1# eureka 配置部分
 2eureka:
 3    client:
 4    register-with-eureka: true # 配置是否进行注册
 5    fetch-registry: true # 配置是否从eureka注册中心拉取注册信息
 6    service-url: # 配置注册地址
 7        defaultZone: http://eureka7001.com:7001/eureka, http://eureka7002.com:7002/eureka
 8    instance:
 9    instance-id: payment8001
10    prefer-ip-address: true # 鼠标到instance上会显示ip
11
12# 配置服务名称
13spring:
14    application:
15    name: cloud-payment-service
这个服务名很重要,用于配置后面用户接口的服务地址。
80 端口关键配置内容
开启 @EnableEurekaClient 注解:
1@SpringBootApplication
2@EnableEurekaClient
3public class OrderMain80 {
4    public static void main(String[] args) {
5        SpringApplication.run(OrderMain80.class, args);
6    }
7}
配置 RestTemplate,开启负载均衡:
1@Configuration
2public class ApplicationContextConfig {
3    @Bean
4    @LoadBalanced // 赋予负载均衡能力
5    public RestTemplate getRestTemplate() {
6        return new RestTemplate();
7    }
8}
Controller 指定负载均衡访问服务地址:
 1@RestController
 2@Slf4j
 3public class OrderController {
 4    public static final String PAYMENT_URL = "http://CLOUD-PAYMENT-SERVICE";
 5
 6    @Resource
 7    private RestTemplate restTemplate;
 8
 9    @GetMapping("/consumer/payment/create")
10    public CommonResult<Integer> create(@RequestParam(value = "serial") String serial) {
11        Payment payment = new Payment(0L, serial);
12        log.info("serial: " + serial);
13        return restTemplate.postForObject(PAYMENT_URL + "/payment/create", payment, CommonResult.class);
14    }
15
16    @GetMapping("/consumer/payment/get/{id}")
17    public  CommonResult<Payment> getPayment(@PathVariable("id") Long id) {
18        return restTemplate.getForObject(PAYMENT_URL + "/payment/get/" + id, CommonResult.class);
19    }
20}
注意:
- Controller 必须是 GetMapping,然后通过
restTemplate.getForObject()或restTemplate.postForObject()发送 get 或 post 请求。 - 配置的服务地址前缀为
http://加上服务接口对应的 application-name 的全大写形式。
效果展示
访问 http://localhost:7001 或者 http://eureka7001.com:7001
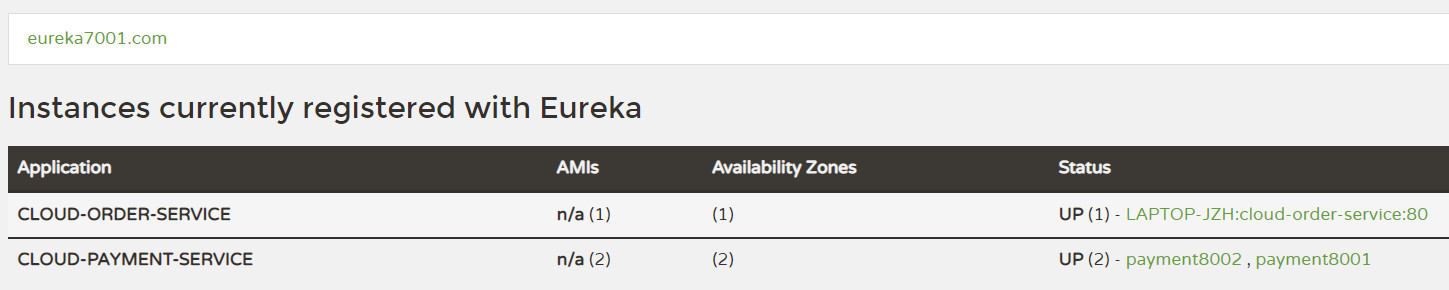
可见所有服务已经成功注册。
访问 http://localhost/consumer/payment/get/3
成功返回结果,服务端口动态变换:
1{
2    "code":200,
3    "message":"查询成功,访问端口:8001",
4    "data":{"id":3,"serial":"ajefskldfa"}
5}
1{
2    "code":200,
3    "message":"查询成功,访问端口:8002",
4    "data":{"id":3,"serial":"ajefskldfa"}
5}