Git 重要操作和知识汇总
前言
这里记录一些重要的 Git 操作和知识, 随着学习和工作中遇到的 git 相关问题而持续更新。
初始化配置
 1# 配置用户
 2git config --global user.name "akynazh"
 3git config --global user.email "akynazh@qq.com"
 4
 5# 配置 CRLF 自动转 LF
 6git config --global core.autocrlf false
 7
 8# 配置 http 代理
 9git config --global http.proxy "http://127.0.0.1:7890"
10git config --global https.proxy "http://127.0.0.1:7890"
11
12# 配置 SSH 代理
13# 编辑 ~/.ssh/config 如下:
14
15#########################################################
16Host github.com
17    User git
18    Port 22
19    Hostname github.com
20    IdentityFile ~/.ssh/id_rsa
21    # Winodws
22    # ProxyCommand connect -S 127.0.0.1:7890 -a none %h %p
23    # Mac
24    ProxyCommand nc -X 5 -x 127.0.0.1:7890 %h %p
25Host ssh.github.com
26    User git
27    Port 443
28    Hostname ssh.github.com
29    IdentityFile ~/.ssh/id_rsa
30    # Winodws
31    # ProxyCommand connect -S 127.0.0.1:7890 -a none %h %p
32    # Mac
33    ProxyCommand nc -X 5 -x 127.0.0.1:7890 %h %p
34
35# connect 命令是在 Windows 中位于 git 安装目录下的一个操作命令, 位置大致在:C:\Program Files\Git\mingw64\bin\connect.exe
36# nc 为 netcat 可通过 brew, apt 安装
37#########################################################
初始化仓库
首先从代码托管网站建立一个仓库,获取仓库地址 url (如果是 ssh 类型的 url, 需要上传本机公钥),然后进入项目所在文件夹,运行以下代码:
1url="your_repo_url"
2git init # 初始化仓库,生成.git文件
3git add . # 将项目文件的修改信息添加到 .git 内的一个暂存区(index)
4git commit -m “init” # 将暂存区的修改信息提交到分支
5git remote add origin $url # 添加远程仓库
6git push origin master # 将本地分支推送到远程仓库
这里执行完 git commit -m "init" 后,我们查看一下本地分支信息:
1> git branch
2* master
可见 git 自动为我们本地创建了一个 master 分支。
执行完 git push origin master 后,我们查看一下本地分支与远程分支的映射关系:
1> git branch -a
2* master
3  remotes/origin/master
4
5> git branch -vv
6* master 3a31f4c init
可见并没有产生映射。所以如果直接使用 git push 提交代码会报错,因为 git 不知道你要提交到哪个远程分支。为了方便提交, 我们可以建立映射关系:
1git branch -u origin/dev_r 将当前分支与远程分支 dev_r 建立映射关系
如果建立了映射关系,那么以后在当前分支 git push 时默认 push 到与当前分支建立关系的那个远程分支。
实际操作如下:
1> git branch -u origin/master
2Branch 'master' set up to track remote branch 'master' from 'origin'.
3> git branch -vv
4* master 3a31f4c [origin/master] init # 可看见产生了映射关系:master <> origin/master
HEAD 相关知识
HEAD 代表当前分支的最新提交名称,它可以由一些修饰符进行修饰进而产生不同的含义。
关于 HEAD~{n}
~ 是用来在当前提交路径上回溯的修饰符。
HEAD~{n} 表示当前所在的提交路径上的前 n 个提交(n >= 0):
HEAD = HEAD~0(即当前最新的一次commit)HEAD~ = HEAD~1HEAD~~ = HEAD~2
关于 HEAD^{n}
^ 是用来切换父级提交路径的修饰符。
当我们始终在一个分支比如 dev 开发/提交代码时,每个 commit 都只会有一个父级提交,就是上一次提交。此时 HEAD~1 等价于 HEAD^。
当并行多个分支开发,feat1, feat2, feat3,完成后 merge feat1 feat2 feat3 回 dev 分支后,此次的 merge commit 就会有多个父级提交。
HEAD^ = HEAD^1第一个父级提交HEAD^2~1第二个父级提交的上一次提交
代码的提交与修改
修改上次提交
这里以对提交的信息和作者进行修改为例,注意邮箱两侧由 <> 包括住
1git commit --amend --message="modify" --author="your_name <your_email>"
2git push -f
修改多次提交
首先列出近 n 次提交:
1# 列出最近3次提交
2git rebase -i HEAD~3
注: 进行 git rebase 之前,先将本地修改提交完毕。
得到大致如下内容:
 1pick 8ae7972 update
 2pick 1a22dfd update
 3pick 00433e4 update
 4
 5# Rebase 368e5c8..00433e4 onto 368e5c8 (3 commands)
 6#
 7# Commands:
 8# p, pick <commit> = use commit
 9# r, reword <commit> = use commit, but edit the commit message
10# e, edit <commit> = use commit, but stop for amending
11# s, squash <commit> = use commit, but meld into previous commit
12# f, fixup [-C | -c] <commit> = like "squash" but keep only the previous
13
14......
可见确实列出了前面 3 次的修改记录。
将需要修改的 commit-id 前面对应 “pick” 改为 “edit”,即可在后续操作中对该分支进行修改。
之后,x 次修改就进行 x 次下面两条命令:
1git commit --amend --message="modify" --author="your_name <your_email>"
2git rebase --continue
经过 x 次以上命令,不出什么问题的话,将会有大致如下的提示出现:
1Successfully rebased and updated refs/heads/master.
现在,强制推送即可:
1git push -f
取消或删除提交
当你在某一次提交中不小心忘记了把一些敏感信息进行 ignore,那么你很可能需要删除那一次提交。
可以使用 git reset 删除提交,记录将被真正删除,是将 HEAD 指向某个 commit-id, 该操作需要谨慎使用。比如, 删除上一次提交,也就是把 HEAD 指向 HEAD^, 追加 --hard 使得工作区和暂存区里面的文件也回到以前的状态,下面是 reset 三种操作选项:
- –soft: 重置 HEAD 到指定的提交,但保持工作目录和暂存区的更改。
- –mixed(默认):重置 HEAD 到指定的提交,并重置暂存区,但保持工作目录的更改。
- –hard:重置 HEAD 到指定的提交,并重置暂存区和工作目录的所有更改。这意味着所有未提交的更改将丢失。
如果使用 git revert 则只是取消修改,提交记录还在,并且多生成了一次 “revert” 提交记录,而对 “revert” 提交进行 “revert” 则会恢复对应修改,并生成一次 “reapply” 提交记录。注意 revert 对于敏感信息的处理是无效的。
在进行 revert 之前需要提交或贮藏(stash)本地修改,而 reset 可以无视当前工作区状态。下面是一些具体操作:
 1git revert [倒数第一个提交] [倒数第二个提交]
 2# e.g. git revert HEAD HEAD~1
 3
 4# 取消上次提交
 5git revert HEAD
 6# 接上,恢复上次提交
 7git revert HEAD
 8
 9# 取消上次提交(删除提交记录, 保留工作区修改)
10git reset HEAD^
11# 取消上次提交(删除提交记录, 保留工作区和暂存区修改)
12git reset --soft HEAD^
13
14# 删除本地所有最新提交, 直接使用远程分支覆盖本地分支
15git reset --hard origin/master
16# 删除上一次提交
17git reset --hard HEAD^
18# 删除某次提交
19git reset --hard commit_id
取消或移动未提交的更改
将本地未提交的更改合并到另一个分支:
通过 stash 操作存储我们在当前分支上所做的更改, 然后我们可以切换到正确的分支并将它们应用到它上面:
1git stash
2git checkout <right-branch>
3git stash pop
取消本地未提交的更改:
1git stash
2# git stash show
3git stash drop
合并某几个提交
如果需要另一个分支的所有代码变动,那么就采用 merge。而如果只需要部分代码变动(某几个提交),这时可以采用 cherry-pick(意为挑选最有利的一个)。
1# 将提交 A 和提交 B 集成到当前分支
2git cherry-pick <HashA> <HashB>
3# 如果有冲突则解决后继续执行 --continue, 如果回到操作前的样子则 --abort, 如果不想则 --quit
4git cherry-pick --continue
合并上游分支
1git remote add upstream https://github.com/whoever/whatever.git
2git fetch upstream
3git checkout master
4
5# Rewrite your master branch so that any commits of yours that
6# aren't already in upstream/master are replayed on top of that
7# other branch:
8
9git rebase upstream/master
代码恢复抢救
有时候脑子瓦特了做出一些离谱的操作, 导致辛苦写的代码白白消失不见, 这时候就需要抢救了……
恢复丢弃的 stash 数据
这是一次真实经历过的事件, 有个 stash 的记录忘记 pop 了, 后来操作失误直接 drop 了, 发现之后直接头脑一片空白! 记录下抢救措施!
1git fsck --lost-found
会看到一条条记录类似:
1dangling commit 6cb2480fa3a59c140b58a07ac734838a2d958d44
2dangling commit e9b4c85c437aacf628e724903df21648538963d4
3dangling blob 983515c6f78d232f1c8878e98598218c142aa9b9
4dangling commit 4ab67a050c5a8288da28154f79ea89106918ea36
5dangling commit c2363d6a03dad8f2bc986f8d21ab0fa38c74477b
6dangling blob 4338d18c5224397a03b40548b7e0f1ea9ca3ffff
复制 dangling commit 的 id (其他的 dangling blob 不用关心), 通过 show 操作查看具体的修改:
1git show 6cb2480fa3a59c140b58a07ac734838a2d958d44
其中日期是 stash 的日期, 摘要会记录你是在哪一条 commit 上进行 stash 操作。
再找到想要的记录后执行 merge 即可:
1git merge 6cb2480fa3a59c140b58a07ac734838a2d958d44
查看或恢复被覆盖掉的提交历史
之前我使用 git commit --amend 修改以前的提交,这样使得 git log 见不到上次提交的信息, 但事实上 git 并没有真的删除上次提交,而是重新创建了一批新的提交,并将当前分支顶端指向了新提交。
可以使用 git reflog 找到并且重新指向原来的提交来恢复它们,注意 reflog 保存的提交是有期限的,需要及时进行操作。
1git reflog
2
3# 可以查看到 amend 前的一条提交 99d2720 如下
43805bba (HEAD -> master, origin/master, origin/HEAD) HEAD@{0}: commit (amend): update
599d2720 HEAD@{1}: commit: update
6...
拿到 commit id 99d2720 之后就好办了, 使用 git reset --hard 99d2720 即可恢复。
开源仓库前清除历史提交
1git checkout --orphan x
2git add -A
3git commit -am "oss"
4git branch -D master
5git branch -m master
6git push -f origin master
子模块相关操作
子模块初始化及更新方法
 1# add >> .gitmodules
 2git submodule add https://github.com/chaconinc/DbConnector
 3# clone
 4git clone --recurse-submodules https://github.com/chaconinc/MainProject
 5# or
 6git clone https://github.com/chaconinc/MainProject && git submodule update --init --recursive
 7# renew
 8cd your/submodule/path && git checkout master && git pull && cd your/proj/root && git commit -am "update submodule" && git push
 9# checkout master on all submodules in a single line (submodules are pinned to a specific sha)
10git submodule foreach --recursive git checkout master
11# publish
12cd your/submodule/path && git commit -am "update" && git push && cd your/proj/root && git commit -am "update submodule" && git push
完全移除子模块的方法
- 手动删除子模块目录;
- 手动删除
.git/modules下子模块暂存区目录; - 更新
.gitmodules文件,移除子模块信息块; - 更新
.git/config文件,移除子模块信息块;
构建自己的 Git 存储库
这里介绍最简单便捷的方法,需要有自己的一台服务器,假设用户是 root,然后先通过配置密钥实现免密登陆服务器,接着进行下面操作即可。
 1# to remote server
 2ssh root@your_server_ip
 3
 4# init git
 5mkdir /git && cd /git
 6git init --bare site.git
 7
 8# remote: clone repo
 9git clone /git/site.git
10# remote: add remote
11git remote add local /git/site.git
12# local: clone repo
13git clone ssh://root@your_server_ip/git/site.git
14# local: add remote
15git remote add server_git ssh://root@your_server_ip/git/site.git
License 配置

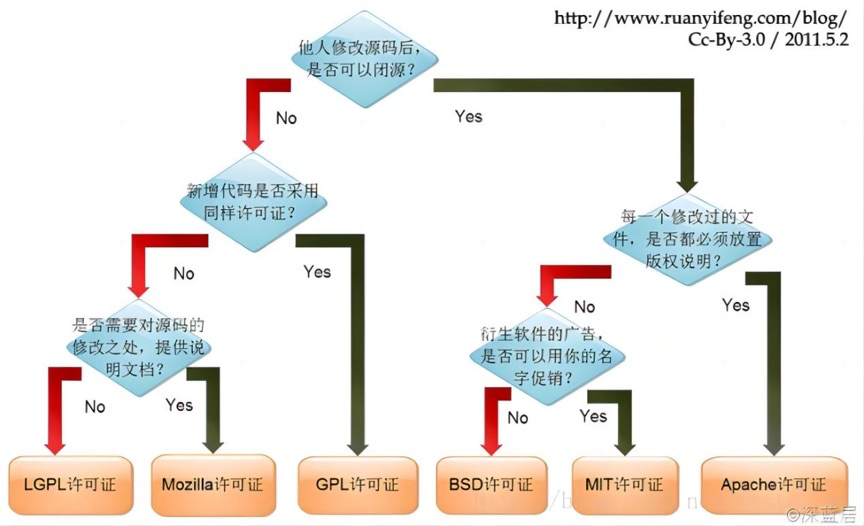
这里讲的比较宽泛,而实际上也不建议去记忆这些,在用到时去找到适合自己项目的 License 即可。如果是使用别人的代码,则再具体去了解对应 License 的条款即可,在 github 中点击 License,也可以很清楚的看到 Permissions、Limitations 以及 Conditions,比如常见的 GPLv3:
- Permissions
- Commercial use: 允许用于商业目的。
- Modification: 允许修改源代码。
- Distribution: 允许分发原始或修改后的代码。
- Patent use: 提供专利使用权。
- Private use: 允许私下使用。
- Limitations
- Liability: 不提供责任担保。
- Warranty: 不提供任何保证。
- Conditions
- License and copyright notice: 必须保留版权声明和许可证信息。
- State changes: 必须声明对源代码所做的更改。
- Disclose source: 分发时必须提供完整的源代码。
- Same license: 衍生作品必须在相同的许可证下发布。
Commit 规范
良好的,遵循一定规则的提交信息不仅有助于编码历史的回顾,也有助于 CHANGELOG 等文件的生成。
格式 Format
每次提交,Commit message 都包括三个部分:Header,Body 和 Footer。其中,Header 是必需的,Body 和 Footer 可以省略。
1<type>(<scope>): <subject>
2<空行>
3<body>
4<空行>
5<footer>
不管是哪一个部分,任何一行都不得超过 72 个字符(或 100 个字符)。Header 部分只有一行,包括三个字段:type(必需)、scope(可选)和 subject(必需)。Footer 部分如果提交存在一个与之关联的 Issue 则要关联。
示例:
1fix(release): need to depend on latest rxjs and zone.js
2
3The version in our package.json gets copied to the one we publish,
4and users need the latest of these.
主题 Subject
subject 是本次 commit 目的的简短描述,一般不要超过 50 个字符:
- 使用祈使句和现在时:例如使用 “change” 而不是 “changed” 或 “changes”。
- 规范大小写和相应书写规则。
- 无需加句号符标识结尾。
类型 Type
| Commit Type | Title | Description |
|---|---|---|
feat |
Features | A new feature |
fix |
Bug Fixes | A bug Fix |
docs |
Documentation | Documentation only changes |
style |
Styles | Changes that do not affect the meaning of the code (white-space, formatting, missing semi-colons, etc) |
refactor |
Code Refactoring | A code change that neither fixes a bug nor adds a feature |
perf |
Performance Improvements | A code change that improves performance |
test |
Tests | Adding missing tests or correcting existing tests |
build |
Builds | Changes that affect the build system or external dependencies (example scopes: gulp, broccoli, npm) |
ci |
Continuous Integrations | Changes to our CI configuration files and scripts (example scopes: Travis, Circle, BrowserStack, SauceLabs) |
chore |
Chores | Other changes that don’t modify src or test files |
revert |
Reverts | Reverts a previous commit |
作用域 Scope
scope 用于说明 commit 影响的范围,比如数据层、控制层、视图层等等,视项目不同而不同,同样属于枚举类型。
常见的有:
- $cmpt
- $container
- $view
- $api
主体 Body
Body是对本地提交的一个详细描述,需要注意的是,描述每行字符不应超过 72 个字符,这利于各种环境下良好的阅读体验。
脚注 Footer
Footer 部分只用于两种情况:
- Breaking Changes: 如果当前代码与上一个版本不兼容,则 Footer 部分以 BREAKING CHANGE 开头,后面是对变动的描述、以及变动理由和迁移方法。
- Closes Issue: 如果当前 commit 针对某个 issue,那么可以在 Footer 部分关闭或关联这个 issue,或多个 issue:
1Closes #234
2Closes #123, #245, #992
3Ref #234
回退 Revert
还有一种特殊情况,如果当前 commit 用于撤销以前的 commit,格式规定如下
- header 以
revert:开头,后面跟着被撤销 commit 的 header - body 以
This reverts commit <hash>的格式,其中的hash是被撤销 commit 的 SHA 标识符。
1revert: feat(pencil): add 'graphiteWidth' option
2
3This reverts commit 667ecc1654a317a13331b17617d973392f415f
如果当前 commit 与被撤销的 commit,在同一个发布(release)里面,那么它们都不会出现在 Change log 里面。如果两者在不同的发布,那么当前 commit,会出现在 Change log 的 Reverts 小标题下面。
Commit aliases
建议用法
使用 rebase 来集成其他分支修改
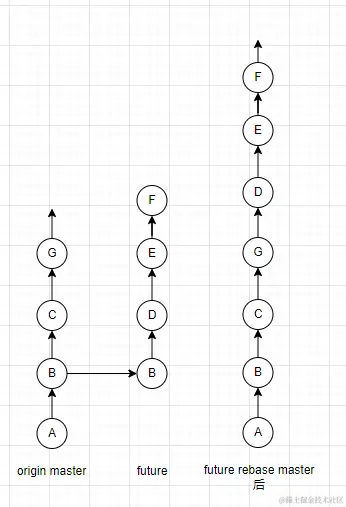
rebase 通常用于重写提交历史。下面的使用场景在大多数 Git 工作流中是十分常见的:
- 我们从 master 分支拉取了一条 feature 分支在本地进行功能开发
- 远程的 master 分支在之后又合并了一些新的提交
- 我们想在 feature 分支集成 master 的最新更改
基本操作流程如下:
 1# [feature]
 2git checkout feature
 3# feature 集成 master 修改
 4git rebase master
 5# 手动解决冲突
 6# ...
 7git rebase --continue
 8git push origin feature -f
 9
10# 或者通过 git pull 完成:
11git pull origin feature --rebase
12# git config pull.rebase true # 也可以进行默认配置
13# 手动解决冲突
14git push origin feature
15---------------------------------
16
17# [master]
18git checkout master
19git merge origin feature
20git push origin master
这样, 提交的历史将是很干净的, 即使在 master 进行了 merge 但是提交历史仍然不会出现 “merge …” 之类的提交, 因为 merge 的目标分支 feature 经过了 rebase, 现在合并后 feature 上的提交就如同在 master 上进行提交一般,效果如下:

使用 fast-forward 来集成其他分支修改
如果当前分支没有新提交,则可以通过 fast-forward 集成其他基于当前分支开发最新提交的其他分支带来的变更,可以少一条 merge 信息,也让提交历史更为干净。不过其实这是执行 git merge 时的默认策略。
而如果当前分支有新提交,则执行 git merge 时,如果有冲突,则需要手动处理冲突,如果没有冲突,则会生成一条 merge 信息,而且也无法进行 fast-forward 操作。
所以其实大部份情况下还是得通过 rebase 来完成提交历史的简洁化。