Linux 食用记录
TOC
文件
文件类型
- d: directory
- -: file
- l: link
- p: pipeline,管道文件
- b: block,块设备文件
- c: character,字符设备文件
- s: socket,套接字文件
重要配置文件
- bashrc
/etc/bashrc:针对所有用户,每开启一个 shell 都会执行一次/etc/skel/.bashrc:针对所有用户,用于在新建一个用户时默认给用户配置的 bashrc~/.bashrc:只针对单个用户,每开启一个 shell 执行一次
- profile
/etc/profile: 针对所有用户,首次登录执行一次/etc/skel/bash_profile: 针对所有用户,用于在新建一个用户时默认给用户配置的 bash_profile~/.bash_profile: 只针对单个用户,首次登录执行一次
换行符相关
我们知道的:
- 回车 CR:\r
- 换行 LF:\n
换行在不同 OS 中有差异:
- win/dos 的换行:\r\n
- unix mac linux 的换行:\n
导致问题:
- unix to win: 换行失败
- win to unix: 多了\r -> \r\n -> ^M。
解决方法,全部统一为 LF 即可。如果 win 下已经为 CRLF,那么可以在 linux 下通过 dos2unix 操作,可以将某目录下的所有文件从 dos 格式转为 unix 格式:
1yum install dos2unix
2find . -name '*' | xargs dos2unix
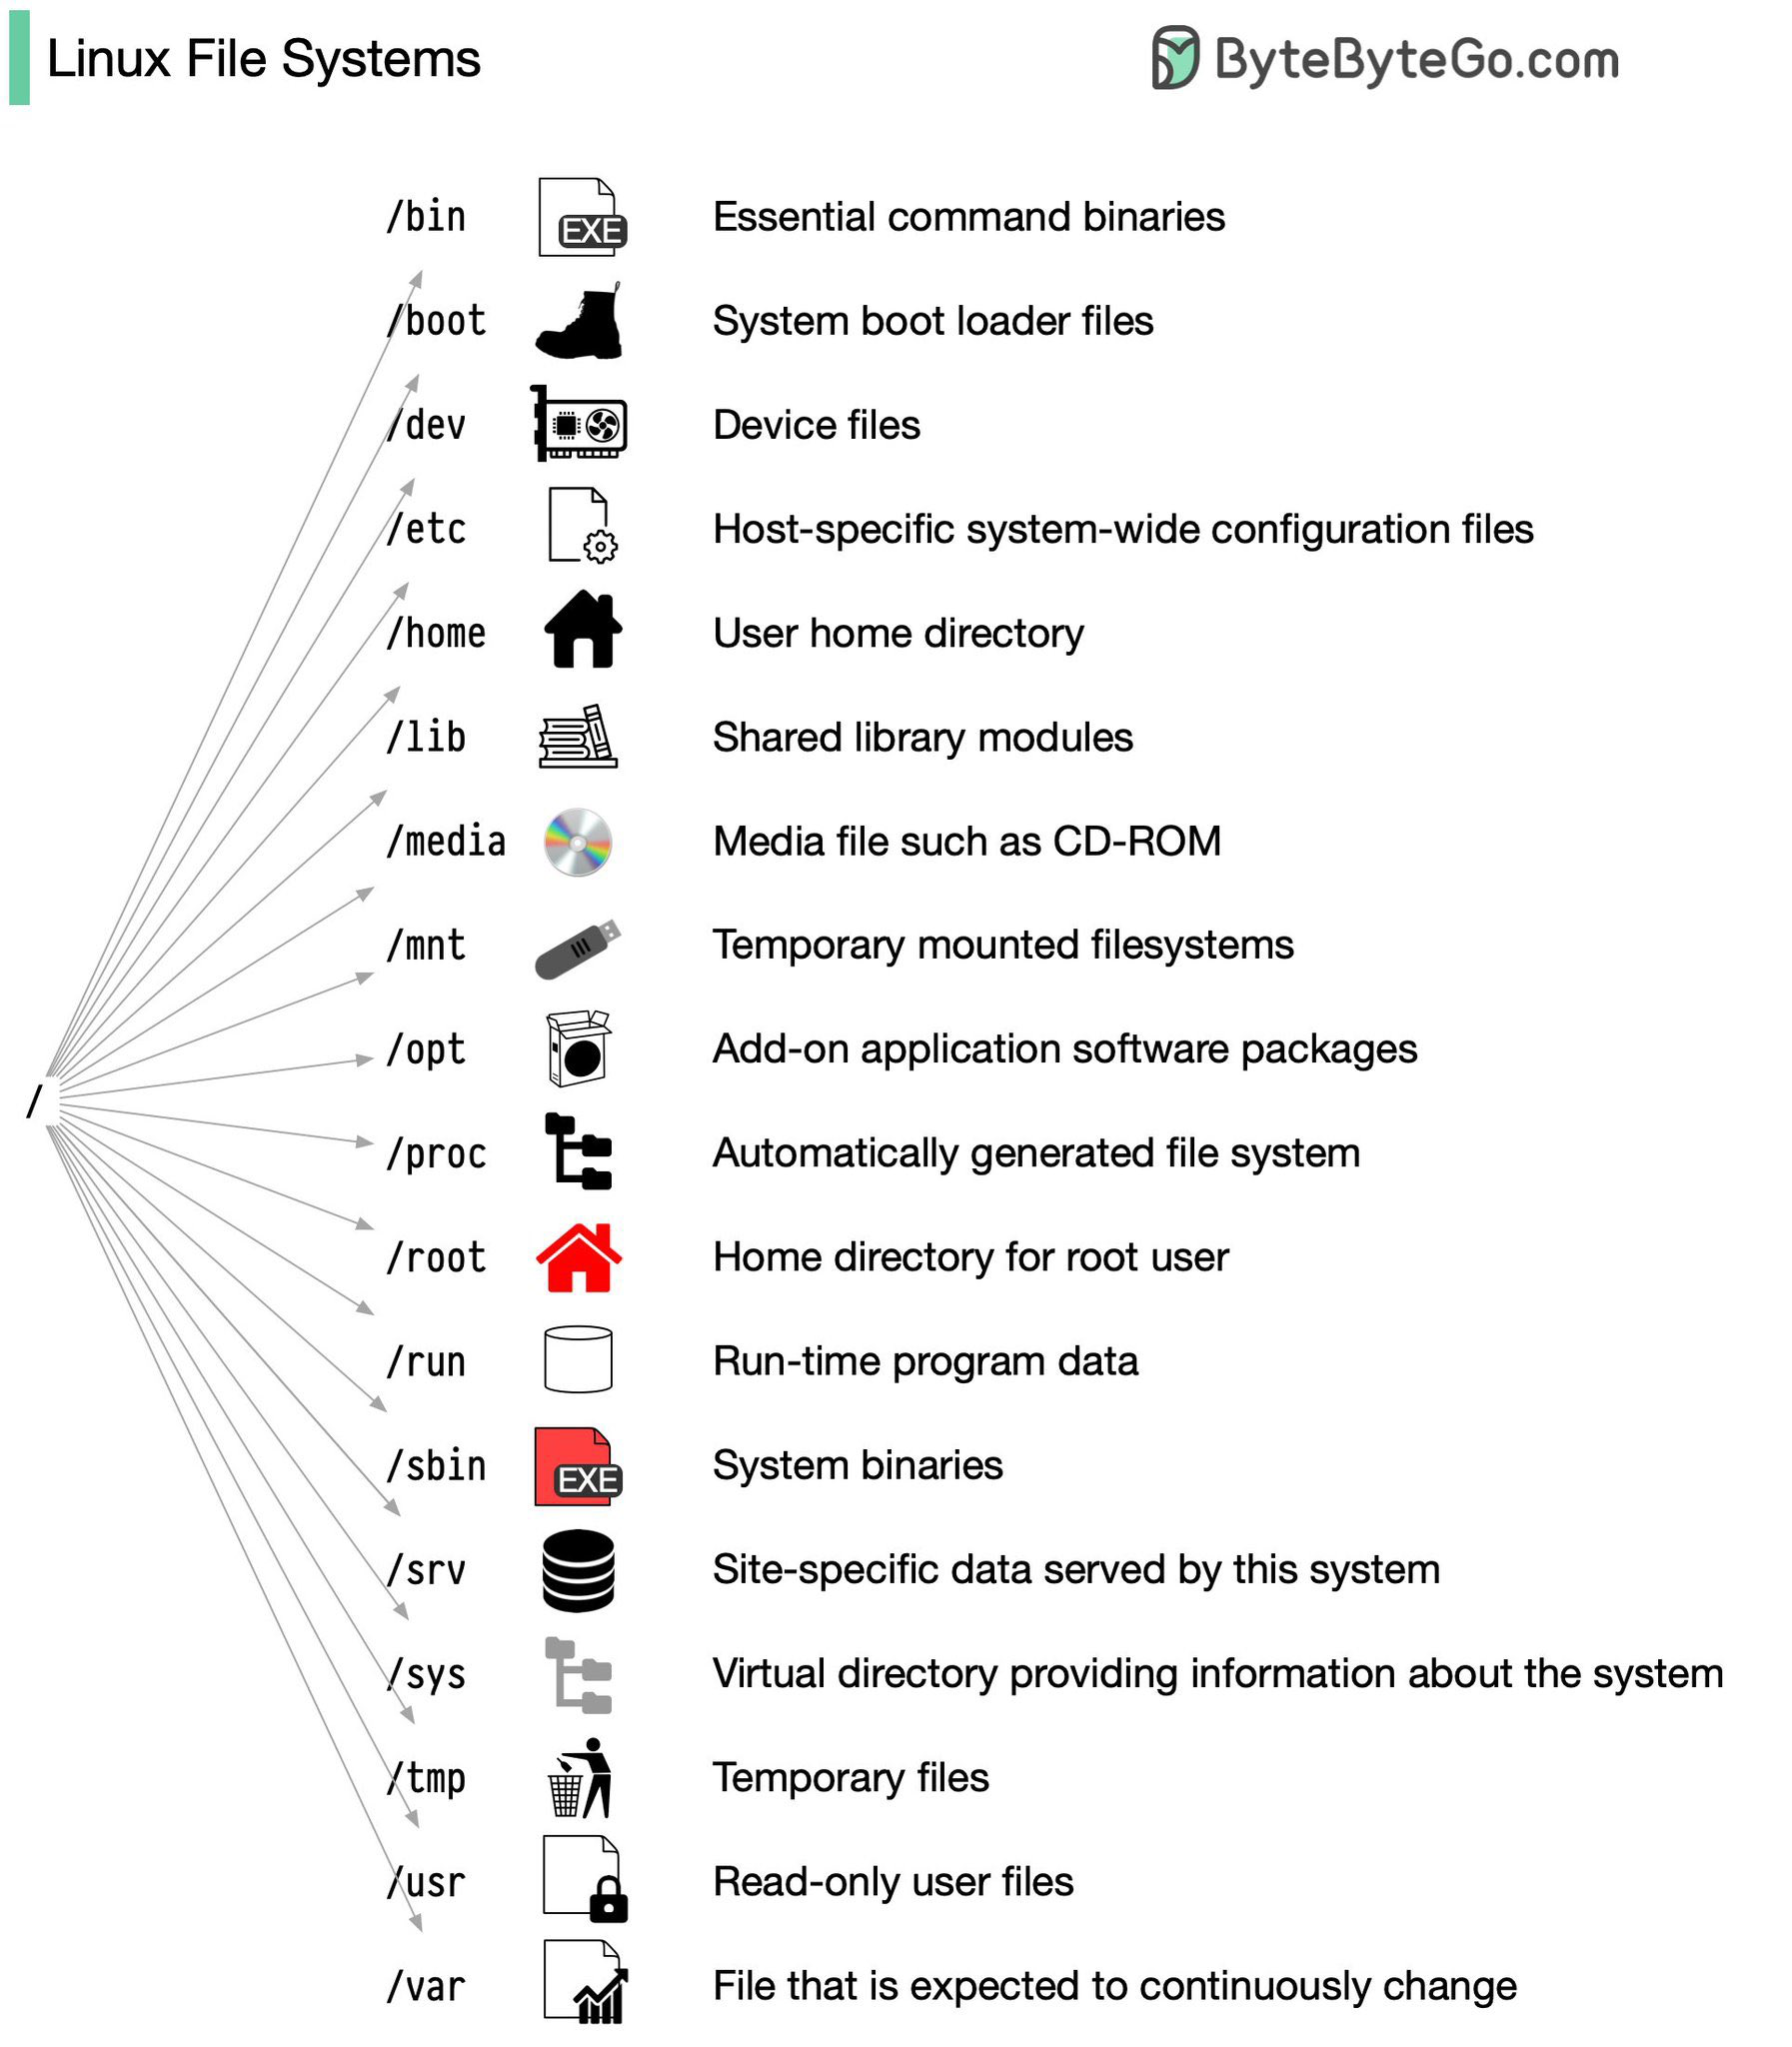
文件系统
cp 命令
常用 cp -au:
-a,即 -dpR,-d 复制时保留链接,-p 保持权限不变,-R 递归复制,-u 表示在源文件有更新或者目标文件不存在时进行目标文件的复制。
文件权限

权限
添加用户
1[root@VM-0-11-centos ~]# useradd jzh
2
3[root@VM-0-11-centos /]# id jzh
4uid=1000(jzh) gid=1000(jzh) groups=1000(jzh)
5
6[root@VM-0-11-centos /]# grep jzh /etc/passwd /etc/shadow /etc/group
7/etc/passwd:jzh:x:1000:1000::/home/jzh:/bin/bash
8/etc/shadow:jzh:!!:18980:0:99999:7:::
9/etc/group:jzh:x:1000:
x 指代密码,对应到 shadow 中,未设定即为 “!!”。
设置密码
在进行 useradd 后密码还未设定。
1[root@VM-0-11-centos /]# passwd jzh
2Changing password for user jzh.
3New password:
4BAD PASSWORD: The password is shorter than 8 characters
5Retype new password:
6passwd: all authentication tokens updated successfully.
若要让用户第一次能通过默认密码登录得上,并提示用户必须修改密码:
1[root@VM-0-11-centos /]# useradd vbird
2[root@VM-0-11-centos /]# echo "123456" | passwd --stdin vbird
3Changing password for user vbird.
4passwd: all authentication tokens updated successfully.
5[root@VM-0-11-centos /]# chage -d 0 vbird # -d接最近一次需要修改密码的时间
使用 vbird 用户登录:
 1vbird@101.34.217.138's password:
 2You are required to change your password immediately (root enforced)
 3Last login: Mon Dec 20 00:04:51 2021 from 113.200.174.13
 4WARNING: Your password has expired.
 5You must change your password now and login again!
 6# 提示需要修改密码
 7
 8# 修改密码
 9Changing password for user vbird.
10Changing password for vbird.
11(current) UNIX password:
12New password:
13Retype new password:
14passwd: all authentication tokens updated successfully.
添加群组与加入群组
1[root@VM-0-11-centos ~]# groupadd testgroup
2[root@VM-0-11-centos ~]# gpasswd testgroup
3Changing the password for group testgroup
4New Password:
5Re-enter new password:
6[root@VM-0-11-centos ~]# gpasswd -A vbird testgroup
7[root@VM-0-11-centos ~]# grep testgroup /etc/group /etc/gshadow
8/etc/group:testgroup:x:1002:
9/etc/gshadow:testgroup:$1$9v24LYZE$V/yYwmmoaKNpe9.zCPK3U.:vbird:
可见 vbird 已经加入该群组
通过 ACL 设置专有权限
团队开发时,由于原有权限无法满足需求,通常需要对某些成员设置专有权限:
- -m 设置后续 acl 参数给文件使用
- -x 删除后续 acl 参数
- -R 递归设置
 1[root@VM-0-11-centos tmp]# touch acl
 2# 针对用户
 3[root@VM-0-11-centos tmp]# setfacl -m u:jzh:rx acl # 为jzh用户设置专有权限
 4
 5# 针对群组
 6[root@VM-0-11-centos tmp]# setfacl -m g:testgroup:rwx acl
 7[root@VM-0-11-centos tmp]# getfacl acl
 8# file: acl
 9# owner: root
10# group: root
11user::rw-
12user:jzh:r-x
13group::r--
14group:testgroup:rwx
15mask::rwx
16other::r--
登录
1su - # 使用root登录
2su - jzh # 使用jzh登录
下面实现 SSH 免 IP 免密登录,编辑 ~/.ssh/config
1Host 输入代替名
2    HostName 输入IP
3    Port 输入端口号
4    User 输入用户名
5    # ProxyCommand "C:\Program Files\Git\mingw64\bin\connect.exe" -S 127.0.0.1:7890 -a none %h %p
注意代理命令 ProxyCommand 在其他机器上的不同用法:
在 unix 下为:
1ProxyCommand nc -X 5 -x 127.0.0.1:7890 %h %p
其中 %h 代表目标主机 ip,%p 代表目标主机端口号,其他参数用法解释如下:
1-X proxy_version
2        Requests that nc should use the specified protocol when talking to the proxy server.
3        Supported protocols are “4” (SOCKS v.4), “5” (SOCKS v.5) and “connect” (HTTPS proxy).
4        If the protocol is not specified, SOCKS version 5 is used.
5
6-x proxy_address[:port]
7        Requests that nc should connect to hostname using a proxy at proxy_address and port.
8        If port is not specified, the well-known port for the proxy protocol is used (1080
9        for SOCKS, 3128 for HTTPS).
注意,nc 为 mac 内置软件,位于 /usr/bin/nc,如果通过 brew 安装了 netcat(nc) 则命令参数不一样。
接下来生成并发送密钥:
1ssh-keygen -t rsa
然后将公钥 ~/.ssh/id_rsa.pub 复制到目标主机 ~/.ssh/authorized_keys 文件中。
服务
systemctl
- 立即启动一个服务:
systemctl start my.service - 立即停止一个服务:
systemctl stop my.service - 重启一个服务:
systemctl restart my.service - 重新加载一个服务的配置文件:
systemctl reload my.service - 重载所有修改过的配置文件:
systemctl daemon-reload - 开启自启动服务:
systemctl enable my.service - 取消开启自启动:
systemctl disable my.service - 查看是否已经自启动:
systemctl is-enabled my.service - 查看服务运行状态:
systemctl status my.service - 查看所有服务:
systemctl --type service
service & chkconfig
- 启动服务:
service my.service start - 终止服务:
service my.service stop - 重启服务:
service my.service restart - 查看服务运行状态:
service my.service status - 开启或取消开机自启动:
chkconfig my.service on/off - 查看开机自启动列表:
chkconfig --list
Unit 配置文件解释
 1- Unit
 2   - Description,服务的描述
 3   - Requires,定义此unit需在哪个daemon启动后才能够启动
 4- Service
 5   - Type,定义启动时的进程行为。它有以下几种值。
 6   - Type=simple,默认值,执行ExecStart指定的命令,启动主进程
 7   - Type=forking,以 fork 方式从父进程创建子进程,创建后父进程会立即退出
 8   - Type=oneshot,一次性进程,Systemd 会等当前服务退出,再继续往下执行
 9   - Type=dbus,当前服务通过D-Bus启动
10   - Type=notify,当前服务启动完毕,会通知Systemd,再继续往下执行
11   - Type=idle,若有其他任务执行完毕,当前服务才会运行
12   - ExecStart,启动当前服务的命令
13   - ExecStartPre,启动当前服务之前执行的命令
14   - ExecStartPost,启动当前服务之后执行的命令
15   - ExecReload,重启当前服务时执行的命令
16   - ExecStop,停止当前服务时执行的命令
17   - ExecStopPost,停止当其服务之后执行的命令
18   - RestartSec,自动重启当前服务间隔的秒数
19   - Restart,定义何种情况 Systemd 会自动重启当前服务,可能的值包括always(总是重启)、on-success、on-failure、on-abnormal、on-abort、on-watchdog
20   - TimeoutSec,定义 Systemd 停止当前服务之前等待的秒数
21   - Environment,指定环境变量
22- Install
23   - WantedBy,值是一个或多个Target,当前Unit激活(enable)时,符号链接会放入/etc/systemd/system目录下面以Target名+.wants后缀构成的子目录中
24   - RequiredBy,它的值是一个或多个Target,当前Unit激活(enable)时,符号链接会放入/etc/systemd/system目录下面以Target名+.required后缀构成的子目录中
25   - Alias,当前Unit可用于启动的别名
26   - Also,当前Unit激活(enable)时,会被同时激活的其他Unit
自定义服务启动
服务的管理通过 systemd 进行,systemd 大部分配置文件位于 /usr/lib/systemd/system/ 内,一般不在这进行修改。
修改的位置位于 /etc/systemd/system 内,在这里可以加入自己的服务。
新建 service 文件
 1vim /etc/systemd/system/test.service
 2
 3# test.service
 4[Unit]
 5Description=service test
 6
 7[Service]
 8Type=simple
 9ExecStart=/bin/bash -c " ~/test-service.sh"
10
11[Install]
12WantedBy=multi-user.target
开启服务并观察
 1[root@VM-0-11-centos ~]# systemctl daemon-reload
 2[root@VM-0-11-centos ~]# systemctl start test.service
 3[root@VM-0-11-centos ~]# systemctl status test.service
 4● test.service - service test
 5   Loaded: loaded (/etc/systemd/system/test.service; disabled; vendor preset: disabled)
 6   Active: active (running) since Wed 2022-04-13 00:04:24 CST; 4s ago
 7 Main PID: 15428 (bash)
 8   CGroup: /system.slice/test.service
 9           ├─15428 /bin/bash -c  ~/test-service.sh | at now;
10           ├─15429 /bin/bash -c  ~/test-service.sh | at now;
11           ├─15430 at now
12           └─15432 sleep 30s
13
14Apr 13 00:04:24 VM-0-11-centos systemd[1]: Started service test.
查看 Unit 启动日志
Systemd 统一管理了所有 Unit 的启动日志,因此只需要使用 journalctl 命令就可以查看到服务的日志。
- 显示尾部指定行数的日志:
journalctl -n 20 - 查看指定服务的日志:
journalctl /usr/lib/systemd/systemd - 查看指定进程的日志:
journalctl _PID=1 - 查看某个 Unit 的日志:
journalctl -u nginx.service
通过 PM2 管理应用服务
 1# 启动名为 xxx 的 python 应用
 2pm2 start api.py --name xxx --interpreter ~/Codes/scripts/.venv/bin/python3
 3# 重启 xxx 应用
 4pm2 restart xxx
 5# 列出 pm2 应用
 6pm2 l
 7# 监视 pm2 所有应用
 8pm2 dash
 9# 查看应用日志
10pm2 logs xxx
11# 保存 pm2 应用列表快照
12pm2 save
13# 从快照恢复 pm2 应用列表
14pm2 resurrect
文本
使用 grep 抓取期望的结果
 1grep [-acinv] [--color=auto] '搜寻字串' filename
 2
 3# 选项与参数:
 4
 5-a :将 binary 文件以 text 文件的方式搜寻数据
 6
 7-c :计算找到 '搜寻字串' 的次数
 8
 9-i :忽略大小写的不同,所以大小写视为相同
10
11-n :顺便输出行号
12
13-v :反向选择,亦即显示出没有 '搜寻字串' 内容的那一行
14
15--color=auto :可以将找到的关键字部分加上颜色的显示喔
在过去登录主机的人中截取登录信息含 root 的行信息:
1last | grep root
使用 awk 命令操作文本
1awk '{[pattern] action}' {filenames}
2awk -F  #-F指定所操作文件中的目标分割字符
3awk -v  # 设置变量
4awk -k {awk_script} {file} # 使用 awk 脚本
以 tab 隔开打印前五行中每行的第一和第三个字符:
1# 注意必须是内双引号外单引号的形式
2last -n 5 | awk '{print $1 "\t" $3}'
使用 “,” 分隔字符:
1awk -F, '{print $1 " - " $2}' log.txt
设置变量 k 等于 1:
1awk -vk=1 '{print $1, $1+k}' log.txt
使用 my.awk 处理 log.txt
1awk -k my.awk log.txt
fzf
匹配完整单词 “linux” 而不是 “linux” 中的字母: 'linux
使用 sed 命令操作文本
 1a: add
 2
 3c: commute
 4
 5d: delete
 6
 7i: insert
 8
 9p: print
10
11s: s/old/new/g
打印删除了第二到第五行的文本:
1nl /etc/passwd | sed '2,5d'
2# 注:nl 可以额外输出行号
- ‘2,$d’ 匹配删除了第 2 到最后一行的文本
- ‘/root/d’ 匹配删除了含 root 的行的文本
使用 cut 处理结果
对以 : 隔开的结果,输出第三个到第五个:
1echo $PATH | cut -d ':' -f 3,5
使用 sort 和 uniq 处理结果
使用 last 将帐号列出,仅取出帐号栏,进行排序后仅取出一位
1last | cut -d ' ' -f 1 | sort | uniq
根据进程号进行对 ps -ef 列出的前 10 个进程进行排序:
1ps -ef | head -n 10 | sort -k 2
-k 指定了第二列的数据(进程号)作为排序的元素。
进程
查看进程
ps -ef
- -e : all processes (-A)
- -f : full-format, including command lines
1[root@VM-0-11-centos ~]# ps -ef | head -n 1
2UID PID PPID C STIME TTY TIME CMD
解释如下:
- PPID 父进程ID
- C 占用CPU百分比
- STIME 就是"start time"
- TTY 进程在哪个终端显示
- CMD 命令的名称和参数
ps aux
- a: all with tty, including other users (和-a是不同的)
- u: user-oriented format
- x: processes without controlling ttys
1[root@VM-0-11-centos ~]# ps -aux | head -n 1
2USER PID %CPU %MEM VSZ RSS TTY STAT START TIME COMMAND
解释如下:
- %MEM 占用内存百分比
- VSZ 该进程使用的虚拟內存量(KB)
- RSS 该进程占用的固定內存量(KB)(驻留中页的数量)
- STAT 进程状态
STAT状态位常见的状态字符有:
1D      //无法中断的休眠状态(通常 IO 的进程);
2R      //正在运行可中在队列中可过行的;
3S      //处于休眠状态;
4T      //停止或被追踪;
5Z      //僵尸进程;
6s      //进程的领导者(在它之下有子进程);
7l      //多线程,克隆线程(使用 CLONE_THREAD, 类似 NPTL pthreads);
8+      //位于后台的进程组;
终止进程
kill
kill 用于想某个进程发送信号。列出所有序号代表的信号含义:
1[root@VM-0-11-centos ~]# kill -l
2 1) SIGHUP       2) SIGINT       3) SIGQUIT      4) SIGILL       5) SIGTRAP      6) SIGABRT      7) SIGBUS       8) SIGFPE       9) SIGKILL ......
最常用的信号是:
- 1 (SIGHUP):重新加载进程。
- 9 (SIGKILL):杀死一个进程。
- 15 (SIGTERM):正常停止一个进程。
默认不带信号序号的 kill 就是 SIGTERM,SIGTERM 可以被阻塞、处理和忽略,因此有的进程可能无法按预期的结束。
根据某个名称获取 PID 并 KILL:
1kill -9 `ps -ef | grep ins | grep -v color | awk '{print $2}'`
killall
无需 PID,通过指定的名称进行对应进程的 kill 操作。
1killall [-iIe] -signal 指令名称
2
3-i: interactive, 互动式 kill
依次询问每个 htppd 相关程序是否需要被终止:
1killall -i -9 httpd
背景工作切换
- 观察当前工作状态:jobs,
jobs -l可同时列出PID。 - 将背景工作拿到前景来处理:
fg %jobnumber - 让工作运行在背景:
bg &jobnumber
当按下 ctrl-z 将 vim 工作放到背景后,默认情况下,vim 工作将处于 “Stpped” 状态,使用 bg 开始运行。
plus: & 将工作放到背景“执行”。
离线管理进程
1nohup {cmd} &
不打印日志:
1nohup {cmd} >/dev/null 2>&1 &
/dev/null 类似于回收站,只是无法像 window 的回收站一样恢复。
>/dev/null,就是把标准输出(1)写到 /dev/null。
对于 2>&1:
我们知道,1 代表标准输出,而 2 代表标准错误输出,而 0 代表标准输入,这里就是将标准错误输出重定向到标准输出,这样也让标准错误输出写到了 /dev/null。
软件
ftp
1apt install vsftpd
2systemctl status vsftpd
Hugo
1wget https://github.com/gohugoio/hugo/releases/download/v0.134.1/hugo_extended_0.134.1_linux-amd64.tar.gz
2tar -zxvf hugo_extended_0.134.1_linux-amd64.tar.gz
v2ray
1# https://github.com/v2fly/fhs-install-v2ray
2bash <(curl -L https://raw.githubusercontent.com/v2fly/fhs-install-v2ray/master/install-release.sh)
3# vim /usr/local/etc/v2ray/config.json
clash
1cd $code && mkdir clash && cd clash
2# 跑路了: wget https://github.com/Dreamacro/clash/releases/download/v1.11.8/clash-linux-amd64-v1.11.8.gz
3gzip -d clash-linux-amd64-v1.11.8.gz
4sudo mv clash-linux-amd64-v1.11.8 /usr/bin/clash
5chmod +x /usr/bin/clash
6wget -O config.yaml https://cop.stc-anycast.com/link/egTt2ZFed953e0m6?sub=3&client=clash
7nohup clash -d . >/dev/null 2>&1 &
8# config: clash.razord.top
 1# auto start: /etc/systemd/system/clash.service
 2[Unit]
 3Description=Clash Proxy
 4
 5[Service]
 6WorkingDirectory=/root
 7ExecStart=/usr/bin/clash -d /root/Codes/clash >/dev/null 2>&1
 8Type=simple
 9RemainAfterExit=yes
10
11[Install]
12WantedBy=multi-user.target
1systemctl daemon-reload
2systemctl start clash
3systemctl enable clash
python-venv
1apt install python3-venv
2# xx/bin/python3 -m venv venv
git.io 短链生成
1curl -i https://git.io -F "url=https://raw.githubusercontent.com/akynazh/v2ray/master/install.sh" -F "code=v2ray.sh"
ElasticSearch
 1# 安装 8.12.0 版本
 2wget https://artifacts.elastic.co/downloads/elasticsearch/elasticsearch-8.12.0-linux-x86_64.tar.gz
 3wget https://artifacts.elastic.co/downloads/elasticsearch/elasticsearch-8.12.0-linux-x86_64.tar.gz.sha512
 4shasum -a 512 -c elasticsearch-8.12.0-linux-x86_64.tar.gz.sha512
 5tar -xzf elasticsearch-8.12.0-linux-x86_64.tar.gz
 6cd elasticsearch-8.12.0/
 7# 安装 ik 中文分词器:
 8./bin/elasticsearch-plugin install https://github.com/medcl/elasticsearch-analysis-ik/releases/download/v8.12.0/elasticsearch-analysis-ik-8.12.0.zip
 9# 开启服务
10./bin/elasticsearch -d
11# 开启密码保护
12vim config/elasticsearch.yml
13xpack.security.enabled: true
14# 生成密码
15./elasticsearch-setup-passwords auto # 自动
16# ./elasticsearch-setup-passwords interactive # 手动
Github CLI
1type -p curl >/dev/null || (sudo apt update && sudo apt install curl -y)
2curl -fsSL https://cli.github.com/packages/githubcli-archive-keyring.gpg | sudo dd of=/usr/share/keyrings/githubcli-archive-keyring.gpg \
3&& sudo chmod go+r /usr/share/keyrings/githubcli-archive-keyring.gpg \
4&& echo "deb [arch=$(dpkg --print-architecture) signed-by=/usr/share/keyrings/githubcli-archive-keyring.gpg] https://cli.github.com/packages stable main" | sudo tee /etc/apt/sources.list.d/github-cli.list > /dev/null \
5&& sudo apt update \
6&& sudo apt install gh -y
Caddy
1sudo apt install -y debian-keyring debian-archive-keyring apt-transport-https curl
2curl -1sLf 'https://dl.cloudsmith.io/public/caddy/stable/gpg.key' | sudo gpg --dearmor -o /usr/share/keyrings/caddy-stable-archive-keyring.gpg
3curl -1sLf 'https://dl.cloudsmith.io/public/caddy/stable/debian.deb.txt' | sudo tee /etc/apt/sources.list.d/caddy-stable.list
4sudo apt update
5sudo apt install caddy
安装后 caddy 默认启动,占用 80 和 2019 端口,其中 2019 为 admin api 调用地址,通过如下配置关闭该入口:
1# /etc/caddy/Caddyfile
2{
3  admin off
4}
服务配置:
 1# /etc/caddy/Caddyfile
 2
 3t.akynazh.site {
 4  # Set this path to your site's directory.
 5  # root * /usr/share/caddy
 6
 7  # Enable the static file server.
 8  # file_server
 9
10  # Another common task is to set up a reverse proxy:
11  # reverse_proxy localhost:1200
12    # reverse_proxy /api localhost:1200
13
14  # Or serve a PHP site through php-fpm:
15  # php_fastcgi localhost:9000
16
17    # test
18    respond "Hello, caddy!"
19}
Caddy serves public DNS names over HTTPS using certificates from a public ACME CA such as Let’s Encrypt or ZeroSSL.
Caddy keeps all managed certificates renewed and redirects HTTP (default port 80) to HTTPS (default port 443) automatically.
Let’s Encrypt
 1# not recommended
 2# apt install certbot
 3
 4# INSTALL
 5path_certbot=/usr/local/share/certbot
 6python3 -m venv $path_certbot
 7$path_certbot/bin/pip install certbot
 8ln -s $path_certbot/bin/certbot /usr/local/bin/certbot
 9
10# CERT
11certbot certonly --webroot -w /var/www/html -d akynazh.site -d www.akynazh.site
12# systemctl stop nginx # standalone mode need port 80 first
13certbot certonly --standalone -d api.akynazh.site # service
14
15# RENEW
16# renewal, add to crontab:
1730 2 5 * *  certbot renew --pre-hook "systemctl stop nginx" --post-hook "systemctl start nginx"
18# 30 2 5 * *  certbot renew
Nginx
1apt install nginx
 1; vim /etc/nginx/nginx.conf
 2worker_processes  2; # cpu * 1~2
 3
 4events {
 5    worker_connections  2048; # default 1024
 6}
 7
 8http {
 9    server {
10        listen 81;
11        listen [::]:81;
12
13        root /var/www/rss;
14        index index.html;
15
16        location / {
17            try_files $uri $uri/ =404;
18            # proxy_pass http://127.0.0.1:8000;
19        }
20    }
21}
1systemctl start nginx
2systemctl status nginx
RSSHub
 1git clone
 2pnpm install
 3# vim .env
 4# add some k=v
 5npm start
 6
 7# run in bg
 8npm install -g pm2
 9pm2 start lib/index.js --name rsshub
10pm2 stop rsshub
11
12# doc
13cd website
14pnpm i
15pnpm run start:zh # pnpm run start
lux
1# amd64
2wget https://github.com/iawia002/lux/releases/download/v0.22.0/lux_0.22.0_Linux_x86_64.tar.gz
3tar -zxvf lux_0.22.0_Linux_x86_64.tar.gz
4mv ./lux /usr/local/bin/
5lux -v
locate
1apt install mlocate
2updatedb
3locate "bot.py"
4
5# updatedb 需要手动执行,否则新文件不会被索引到
fzf
1apt install fzf
2fzf --version
3
4ctrl + r -> search command history
5fzf
ripgrep
1apt install ripgrep
2rg --version
3
4rg -i "test"
5rg -ic "test"
6rg -uuu -ic "test"
bat
1# amd64
2wget https://github.com/sharkdp/bat/releases/download/v0.24.0/bat-musl_0.24.0_amd64.deb
3dpkg -i bat-musl_0.24.0_amd64.deb
4bat --version
vim
1# /etc/vimrc # or: /etc/vim/vimrc
2
3set tabstop=4 # 修改vim中tab长度
4set shiftwidth=4 # 修改vim自动缩进长度
5set noeb vb t_vb= # 禁用vim蜂鸣声
6set number
1#/etc/inputrc
2
3set bell-style none # 禁用bash蜂鸣声
rclone
1# pp:Apps -> pikpak-login beta for rclone
2curl https://rclone.org/install.sh | sudo bash
3rclone -v
4rclone version
5## webdav
6## rclone copy local_path webdav:/
7## rclone sync local_path webdav:/local_path
pikpakcli
1wget https://github.com/52funny/pikpakcli/releases/download/v0.15/pikpakcli_0.15_Linux_x86_64.tar.gz
2tar -zxvf pikpakcli_0.15_Linux_x86_64.tar.gz
3mv ./pikpakcli /usr/bin/
4pikpakcli -h
5mkdir -p ~/.config/pikpakcli
6echo "username:" >> ~/.config/pikpakcli/config.yaml
7echo "password:" >> ~/.config/pikpakcli/config.yaml
8vim ~/.config/pikpakcli/config.yaml
jq
1## centos
2## yum install epel-release
3yum install jq
4## ubuntu
5apt install -y jq
java
1wget https://repo.huaweicloud.com/java/jdk/8u151-b12/jdk-8u151-linux-x64.tar.gz
2tar -zxvf jdk-8u151-linux-x64.tar.gz
3sudo mkdir /usr/local/java
4sudo mv jdk1.8.0_151 /usr/local/java/jdk1.8
1## java env
2export JAVA_HOME=/usr/local/java/jdk1.8
3export CLASSPATH=.:$JAVA_HOME/lib:$JAVA_HOME/jre/lib
4export PATH=$PATH:$JAVA_HOME/bin
maven
1maven_version="3.6.3" ## 3.9.4
2wget "https://archive.apache.org/dist/maven/maven-3/$maven_version/binaries/apache-maven-$maven_version-bin.tar.gz"
3sudo mkdir /usr/local/maven
4tar -zxvf apache-maven-$maven_version-bin.tar.gz
5sudo mv apache-maven-$maven_version /usr/local/maven/$maven_version
6
7## 环境变量
8## MAVEN_HOME=/usr/local/maven/{$maven_version}
9## export PATH=$PATH:$MAVEN_HOME/bin
镜像配置:
 1<!-- ~/.m2/settings.xml -->
 2<settings xmlns="http://maven.apache.org/SETTINGS/1.0.0"
 3    xmlns:xsi="http://www.w3.org/2001/XMLSchema-instance"
 4    xsi:schemaLocation="http://maven.apache.org/SETTINGS/1.0.0 https://maven.apache.org/xsd/settings-1.0.0.xsd">
 5
 6    <mirrors>
 7        <mirror>
 8            <id>alimaven</id>
 9            <name>aliyun maven</name>
10            <url>http://maven.aliyun.com/nexus/content/groups/public/</url>
11            <mirrorOf>central</mirrorOf>
12        </mirror>
13    </mirrors>
14</settings>
python3
如果系统已经安装 python3 但未安装 pip:
1apt install python3-pip
 1yum update
 2yum install wget gcc openssl-devel bzip2-devel libffi-devel -y
 3yum groupinstall "Development Tools" -y
 4wget https://www.python.org/ftp/python/3.10.2/Python-3.10.2.tgz
 5tar -zxvf Python-3.10.2.tgz
 6cd Python-3.10.2
 7./configure --enable-optimizations
 8make altinstall
 9ln -sf /usr/local/bin/python3.10 /usr/bin/python3
10ln -sf /usr/local/bin/python3.10 /bin/python3
11ln -sf /usr/local/bin/pip3.10 /usr/bin/pip3
12ln -sf /usr/local/bin/pip3.10 /usr/bin/pip
13
14------------------------------------------------------
15
16apt update
17apt install software-properties-common -y
18add-apt-repository ppa:deadsnakes/ppa && apt update
19apt install python3.10 -y
20ln -sf /usr/bin/python3.10 /usr/bin/python3
21curl https://bootstrap.pypa.io/get-pip.py -o get-pip.py && python3 get-pip.py
22ln -sf /usr/local/bin/pip3.10 /usr/bin/pip
可能遇到的问题及解决方法:
(1)“ssl module in Python is not available” in CentOS
CentOS 7 and RHEL 7 ship an unsupported OpenSSL version. CentOS 7’s EPEL repository comes with openssl11 package. The package install files in non-standard locations and uses a custom pkgconf module name openssl11. You can patch Python’s configure script to use the custom build:
 1yum install -y epel
 2......
 3No package epel available.
 4yum search epel
 5......
 6================================ N/S matched: epel ================================
 7epel-release.noarch : Extra Packages for Enterprise Linux repository configuration
 8yum install epel-release.noarch
 9yum install -y openssl11-devel
10cd /path/to/cpython-sources
11sed -i 's/PKG_CONFIG openssl /PKG_CONFIG openssl11 /g' configure
12./configure --enable-optimizations
13make altinstall
(2)No module named ‘distutils.cmd’
1apt install python3-distutils -y
(3)python setup.py egg_info did not run successfully.
1pip install setuptools -U
(4)ModuleNotFoundError: No module named ‘_lzma’
1yum install xz-devel
2yum install python-backports-lzma
3pip install backports.lzma
找到 lzma.py,如日誌提示的 /usr/local/lib/python3.7/lzma.py,修改 zma.py 文件中的導入部份如下:
修改前:
1from _lzma import *
2from _lzma import _encode_filter_properties, _decode_filter_properties
修改後:
1try:
2    from _lzma import *
3    from _lzma import _encode_filter_properties, _decode_filter_properties
4except ImportError:
5    from backports.lzma import *
6    from backports.lzma import _encode_filter_properties, _decode_filter_properties
node
 1# (NVM) 安装和更新 node / npm
 2
 3## install nvm pkg manager
 4export NVM_DIR="$HOME/.nvm" && (
 5  git clone https://github.com/nvm-sh/nvm.git "$NVM_DIR"
 6  cd "$NVM_DIR"
 7  git checkout `git describe --abbrev=0 --tags --match "v[0-9]*" $(git rev-list --tags --max-count=1)`
 8) && \. "$NVM_DIR/nvm.sh"
 9
10# 添加一下脚本到 .*rc 文件中
11export NVM_DIR="$HOME/.nvm"
12[ -s "$NVM_DIR/nvm.sh" ] && \. "$NVM_DIR/nvm.sh" # This loads nvm
13[ -s "$NVM_DIR/bash_completion" ] && \. "$NVM_DIR/bash_completion"  # This loads nvm bash_completion
14
15## close and reopen your terminal to start using nvm
16nvm install node ## This will install the latest version of Node.js and npm.
17
18node -v
19npm -v
20
21nvm current
22## list all the available versions of Node.js that you can install
23nvm ls-remote
24
25## Identify the latest version of Node.js and install it using the following command:
26nvm install <version>
27## nvm install 16.8.0
28
29## If you want to set the newly installed version of Node.js as the default version, you can run the following command:
30nvm alias default <version>
redis
 1yum install epel-release
 2yum install -y redis
 3
 4-------------------------------------
 5
 6apt install redis-server
 7
 8-------------------------------------
 9
10## 启动 Redis
11redis-server
12## 检查 Redis 是否正在运行
13redis-cli ping
14## 访问Redis
15redis-cli
16## 停止 Redis
17systemctl stop redis-server
c/c++
1yum install gcc -y
2yum install gcc-c++ -y
3yum install gdb -y
git
1# yum install git -y
2apt install git -y
3
4git config --global user.name "xxx"
5git config --global user.email "xxx"
Go
1# apt install golang-go
2
3wget https://go.dev/dl/go1.22.4.linux-amd64.tar.gz
4
5export PATH="$PATH:/usr/local/share/go/bin"
6export GO111MODULE=on
7export GOPROXY=https://goproxy.io,direct
8export GOPATH=$HOME/.go
桌面
共享文件夹
C:/Users/akyna/Codes <——> /home/jzh/Codes
虚拟机面板 -> 共享文件夹 -> 选择位置,勾选固定分配和自动挂载
-> 执行命令将 jzh 加入共享组,然后重启:
1usermod -a -G vboxsf jzh
2reboot
共享宿主机代理
- 宿主机 clash 勾选 ALLOW_LAN
- 宿主机防火墙开放 7890 号端口
- 进入 Ubuntu Desktop settings,根据主机局域网ip进行配置
命令行也无需配置 http_proxy 等变量,自动配好了!
解决自动生成文件夹的问题
vim ~/.config/user-dirs.dirs
1# 将类似如下行删除
2XDG_PUBLICSHARE_DIR="$HOME/Public"
3XDG_DOCUMENTS_DIR="$HOME/Documents"
4XDG_MUSIC_DIR="$HOME/Music"
5XDG_PICTURES_DIR="$HOME/Pictures"
6XDG_VIDEOS_DIR="$HOME/Videos"
sudo vim /etc/xdg/user-dirs.conf
1enabled=False
然后重启即可。
解决点击无响应的 Bug
1sudo apt-get update
2sudo apt-get install --reinstall gnome-control-center
屏幕分辨率
设备 -> 安装增强功能
1cd /media
2cd VBOXADDITIONS_4.3.6_91406
3sh VBboxLinuxAdditions.run
4reboot
系统 -> 首选项 -> 显示器,可看到新出现的分辨率 1024x768。
命令行启动
1VBoxManage startvm Local-Ubuntu-Jzh --type headless
网络
Ubuntu 配置静态 IP
注:本次配置环境是在 Ubuntu 20.04 下。
通过 netplan 的方法进行,编辑 /etc/netplan/00-installer-config.yaml 如下:
 1network:
 2  ethernets:
 3    enp0s3: # network card
 4      dhcp4: no
 5      optional: no
 6      nameservers:
 7        addresses: [114.114.114.114, 8.8.8.8] # dns
 8      gateway4: 192.168.1.1
 9      addresses: [192.168.1.128/24] # ip address and netmask
10  version: 2
首先将 enp0s3 改为自己的网卡,然后配置 IP 地址,子网掩码,网关,以及 DNS 服务器地址。
接下来执行 sudo netplan apply 即可完成。
CentOS 配置静态 IP
注:本次配置环境是在 CentOS 7.9 下。
找到当前网络下网卡名,然后编辑 /etc/sysconfig/network-scripts 下的 ifcfg-{网卡名} 文件如下:
1BOOTPROTO="static"
2IPADDR=192.168.1.127
3NETMASK=255.255.255.0
4GATEWAY=192.168.1.1
5DNS1=114.114.114.114
6DNS2=8.8.8.8
7ONBOOT=yes
需要自行配置 IP 地址,子网掩码,网关,以及 DNS 服务器地址。
接下来执行 systemctl restart network 即可完成。
Debian 配置静态 IP
注:本次配置环境是在 Debian 11.7 下。
首先可以通过 ip -c link show 找到自己的网卡名称, 我的是 enp0s3。
接下来,编辑 /etc/network/interfaces 文件:
1allow-hotplug enp0s3 # network card
2iface enp0s3 inet static
3address 192.168.1.200 # ip address
4netmask 255.255.255.0
5gateway 192.168.1.1
6dns-nameservers 114.114.114.114 8.8.8.8
需要自行配置 IP 地址,子网掩码,网关,以及 DNS 服务器地址。
接下来,执行:systemctl restart ifup@{网卡名} 即可完成。
镜像
Yum 镜像
 1## huawei
 2cp -a /etc/yum.repos.d/CentOS-Base.repo /etc/yum.repos.d/CentOS-Base.repo.bak
 3wget -O /etc/yum.repos.d/CentOS-Base.repo https://repo.huaweicloud.com/repository/conf/CentOS-7-reg.repo
 4
 5## aliyun
 6## mv /etc/yum.repos.d/CentOS-Base.repo /etc/yum.repos.d/CentOS-Base.repo.bak
 7## wget -O /etc/yum.repos.d/CentOS-Base.repo http://mirrors.aliyun.com/repo/Centos-7.repo
 8
 9yum clean all
10yum makecache
11yum -y update
Debian 镜像
1deb http://deb.debian.org/debian buster main contrib non-free
2deb http://deb.debian.org/debian buster-updates main contrib non-free
3deb http://deb.debian.org/debian buster-backports main contrib non-free
4deb http://security.debian.org/debian-security/ buster/updates main contrib non-free
Ubuntu 镜像
 1cp /etc/apt/sources.list /etc/apt/sources.list.bak
 2vim /etc/apt/sources.list
 3
 4lsb_release -c 查看版本代码
 5
 6如要用于其他版本,把 focal 换成其他版本代号即可: 22.04:jammy;20.04:focal;18.04:bionic;16.04:xenial;14.04:trusty。
 7
 8deb https://mirrors.ustc.edu.cn/ubuntu/ focal main restricted universe multiverse
 9deb https://mirrors.ustc.edu.cn/ubuntu/ focal-security main restricted universe multiverse
10deb https://mirrors.ustc.edu.cn/ubuntu/ focal-updates main restricted universe multiverse
11deb https://mirrors.ustc.edu.cn/ubuntu/ focal-backports main restricted universe multiverse
12
13---------------------------------------------
14
15deb https://mirrors.ustc.edu.cn/ubuntu/ jammy main restricted universe multiverse
16deb https://mirrors.ustc.edu.cn/ubuntu/ jammy-security main restricted universe multiverse
17deb https://mirrors.ustc.edu.cn/ubuntu/ jammy-updates main restricted universe multiverse
18deb https://mirrors.ustc.edu.cn/ubuntu/ jammy-backports main restricted universe multiverse
任务
启动任务
1# crontab -e
2@reboot  /root/startup.sh
定时任务
unix 系的系统都可以通过 crontab 来执行定时任务, 一个很好地帮助我们编写 crontab 的网址: crontab.guru。
Crontab 规则:
1# 分钟(0-59) 小时(0-23  日期(1-31) 月份(1-12) 星期几(0-6, 其中 0 代表星期日)
2*/1 * * * * cmd
Crontab 实用例子
1# 每分钟执行一次:
2* * * * * cmd ## or: */1 * * * * cmd
3# 每天早上 6 点 10 分执行一次:
410 6 * * * cmd
5# 每两个小时执行一次:
60 */2 * * * cmd
7# 在 1 月 1 日早上 4 点执行一次:
80 4 1 1 * cmd
crontab 不会使用在 .bashrc 之类的文件中定义的变量, 别名和函数。
解决方法是在 crontab 中通过 bash -lic "{your_cmd}" 调用脚本或命令, 同时如果调用了 python 之类脚本且脚本里还使用了类似 os.system() 之类的系统调用命令, 则 os.system() 里也要通过 bash -lic "{your_cmd}" 调用脚本或命令。
另外, 即使使用了 -lic, crontab 中除命令外的路径都需要使用绝对路径。
-i 将开启一个 interactive shell, 执行 ~/.bashrc, 如需使用别名, 则需添加使用该参数, 因为 alias 在 non-interactive shell 中默认是被禁用的。
-l 将开启一个 login shell, 执行 ~/.profile。
PS: 部分命令可能即使添加了 -lic 也无法检索到, 比如一些装在 /usr/local/bin 下的可执行文件, 那是因为这些路径没有被你加入 PATH 中~
记一个正确使用示例:
10 0 * * 1 /usr/bin/zsh -lic "python3 /root/Codes/saver.py -ft 1"
其中注意 zsh 需要使用绝对路径, 因为不在 -lic 指定的命令中; python3 无需使用绝对路径, 因为它处于 -lic 指定的命令中; 而 saver.py 虽然处在 -lic 指定的命令中, 但是它不是命令, 所以还是需要使用绝对路径。
Crontab 配置文件
配置文件在:/var/spool/cron/{用户名}
每个用户对应一个 crontab 配置, 所以在 crontab 语句中使用 ~ 是可以的。
PS: 在 mac 中, 该文件对用户不可见。
Crontab 日志位置
Centos: /var/log/cron
Ubuntu / Debian: 默认情况下被打印到: /var/log/syslog, 通过如下命令查看:
1grep CRON /var/log/syslog
MacOS: 默认情况下被禁用, 建议使用 mail 来确定是否执行成功。
Crontab 邮件位置
每个 crontab 任务执行之后都会发送一封邮件给用户, 位置在 /var/mail/{用户名}
通过该邮件可以方便地进行 debug。
如果没有该服务, 可以通过如下命令解决:
1sudo apt install postfix -y
2systemctl start postfix
外观
主机名称
1hostnamectl set-hostname xxx
登录欢迎信息
在 /etc/update-motd.d 自行修改基本欢迎信息。
命令提示符
1vim ~/.bashrc
2
3export PS1="[\u => \w]\$ "
 1\a	铃声字符
 2\d	格式为“日 月 年”的日期
 3\e	ASCII 转义字符
 4\h	本地主机名
 5\H	完全合格的限定域主机名
 6\j	shell 当前管理的作业数
 7\1	shell 终端设备名的基本名称
 8\n	ASCII 换行字符
 9\r	ASCII 回车
10\s	shell 的名称
11\t	格式为“小时:分钟:秒”的24小时制的当前时间
12\T	格式为“小时:分钟:秒”的12小时制的当前时间
13\A	格式为“小时:分钟”的24小时制的当前时间
14@	格式为 am/pm 的12小时制的当前时间
15\s	shell的名字
16\u	当前用户的用户名
17\v	bash shell 的版本
18\V	bash shell 的发布级别
19\w	当前工作目录
20\W	当前工作目录的基本名称
21!	该命令的 bash shell 历史数
22#	该命令的命令数量
23$	如果是普通用户,则为美元符号$;如果超级用户(root 用户),则为井号#。
24\nnn	对应于八进制值 nnn 的字符
25\	斜杠
26[	控制码序列的开头
27]	控制码序列的结尾
时间
系统时区修改
 1root@OranMe2474:~# timedatectl list-timezones | grep Shanghai
 2Asia/Shanghai
 3root@OranMe2474:~# timedatectl set-timezone Asia/Shanghai
 4root@OranMe2474:~# timedatectl
 5               Local time: Mon 2022-11-28 10:59:39 CST
 6           Universal time: Mon 2022-11-28 02:59:39 UTC
 7                 RTC time: n/a
 8                Time zone: Asia/Shanghai (CST, +0800)
 9System clock synchronized: yes
10              NTP service: inactive
11          RTC in local TZ: no
Crontab 时区修改
1# /etc/crontab
2
3CRON_TZ=Asia/Shanghai
4TZ=Asia/Shanghai
1systemctl restart cron